
Hundreds Of Free Knitting Patterns And So Much More |
Barbara Breiter's Knitting On The Net |
|
Learn To Knit
|
Side To Side Shrug Knitting PatternDesigned by Leef Bloomenstiel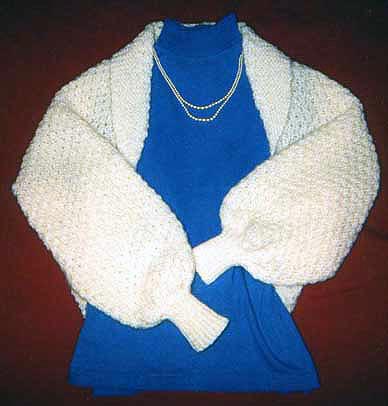 2 skeins Lion Brand Textures Mohair Blend (worsted weight) 396 yards/mohair and wool blend (discontinued) Size 5 US straight needles Size 9 US 24 inch circulars stitch markers row counter Gauge: 17 sts and 24 rows=4 inches in St st with larger needles Instructions Pattern Stitch: Double Moss (multiple of 4) Row 1: K2, P2 across the row Row 2: K2, P2 across the row Row 3: P2, K2 across the row Row 4: P2, K2 across the row Repeat rows 1-4 for pattern. Begin at the left cuff, with smaller needles, CO 35 sts. Work in K1, P1 ribbing for 3 inches. Increase row: K1, M1 across the row (M1 = Make one by a small backward loop placed on the needle). You should have 70 stitches. Next row: Purl across. Change to size larger needles. Row 1 (RS): Knit across (start row counter with this row) Row 2: K3, P64, K3 (You will keep these border stitches in garter stitch) Row 3: Begin Double Moss pattern and carry this pattern throughout: K3, (Double Moss pattern), K3 Continue knitting in pattern. Stop after completing row 10 (WS row). You will begin the center panel increases. Row 11 will be the first increase row. (Note: ALL increases and decreases will be made on the RS or odd numbered rows. ALL increases and decreases will be made at the junction between the double moss pattern and the garter stitch band). We will increase by 2 stitches on increase rows by using a M1, placing a backward loop on the needle. The first M1 will be after you knit the three edge stitches, continue in Double Moss, and M1 before the last three edge stitches. The next row, a WS row, you will either knit or purl each M1 stitch as to be worked into the Double Moss Pattern. For now, keep that single stitch in the pattern for you will continue to increase and will add to it to get the full pattern. Row 11: K3, M1, Double Moss on 64 stitches in pattern as established to last three stitches, M1, K3 You will make this increase on every 10th row from now on until you have 78 stitches in the center panel (a K3, Double Moss on 78 stitches, K3). Increase rows will be on rows 21, 31, 41, 51, 61, and 71. Work 5 rows even and make another increase on row 77, making a total center panel of 80 stitches in Double Moss. On the RS, the first three selvedge stitches that you knit are the bottom of the shrug, and the last three selvage stitches that you knit are the top of the shrug. In the next stage, the bottom selvage stitches will be increased to a total of 5 selvage stitches, while the top selvedge stitches will be increased to a total of 10 selvedge stitches for a fold back collar. Make these increases as follows. After the last center panel increase on row 77, knit evenly until row 81. Row 81 (RS): K3, M1, place marker (this is the bottom edge of the shrug), Knit 80 center panel stitches in pattern, place marker, M1, K3 (these are the top edge stitches that will form the fold down collar) Row 82: Knit to marker, slip marker, Knit in pattern to marker, slip marker, knit to the end (keep the selvedge stitches in garter stitch) Repeat these two rows until there are 5 sts in the bottom selvedge, which should be row 83. Remove the marker on the bottom selvedge. Knit in pattern: row 84 which should be K5, knit in pattern, K5. Stop increasing in the bottom selvedge and increase ONLY in the top selvedge as follows. Row 85: K5, knit in pattern to top selvedge marker, slip marker, M1, K to end Row 86: Knit to marker, knit in pattern to last 5 stitches, K5 Repeat rows 85 and 86 until there are 10 top selvedge stitches (remove marker) which should be row 93. Row 94: K10, knit in pattern, K5 Row 95: K5, knit in pattern, K10 Repeat these two rows until piece measures from your wrist to the center of your back. Now, you can simply knit from the middle of the back to the right wrist, reversing the row counter each row. Be sure you keep the odd numbered rows as the right side, and the even numbered rows as the wrong side. On the garter stitch selvedge rows where you increased with a M1, simply K2tog. In decreasing the middle or pattern section, each row where you increased with a M1 either K2tog or P2tog, whichever keeps the Double Moss patterning consistent. After completing the right wrist ribbing, cast off in rib pattern. Finishing Weave in ends. Seam the arms for a length that is attractive for your shape and the drape of the garment. The best way to do this is to first seam the right and left wrist. Put the shrug on, arrange it comfortably on your wrists, and fold back the garter stitch collar. Now take some large safety pins and pin both sleeves up to where you like the drape and the fit for your shoulders best. If you are making it as a gift for someone else, I have found that the seaming usually averages about 12 or 13 inches above the wrist ribbing. ©Leef Bloomenstiel. See Abbreviations and the Glossary for help. |