
Hundreds Of Free Knitting Patterns And So Much More |
Barbara Breiter's Knitting On The Net |
|
Learn To Knit
|
Diagonal Panels Pullover Sweater Knitting PatternDesigned by Barbara Breiter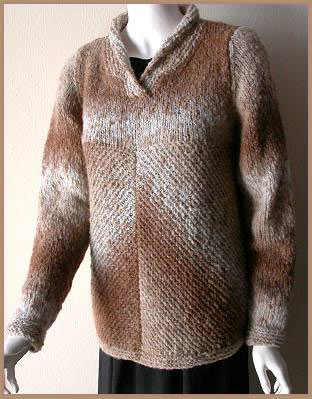 Self-striping yarn often results in uneven horizontal stripes. This pullover sweater, available in four sizes, takes advantage of the color changes by knitting panels diagonally.
Sizes:
Self-striping yarn often results in uneven horizontal stripes. This pullover sweater, available in four sizes, takes advantage of the color changes by knitting panels diagonally.
Sizes:S (M, L, XL) Finished Chest Size 36 (40, 44, 48)" Gauge: 14 sts and 19.5 rows=4" in St st Materials: Size 10 US (6 mm) straight needles or size needed to obtain gauge Size 10 US (6 mm) 32" circular needles Merino Stripes by Crystal Palace Yarns 7 (7, 8, 9) balls - Color 021 Sandstorm 90% Merino wool/10% polyester 50 grams/1.75 ounces 115 yds/105 meters 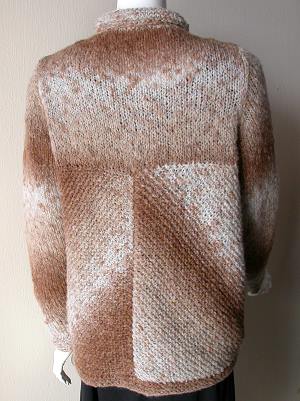 Instructions
Back Note: You may want to use circular needles and knit back and forth to make the rectangles as it makes measuring easier. Place a safety pin on the side you increase on to more easily remember. Rectangles (Make 2) CO 3 sts. Row 1: K3 Row 2: K into front and back of first st, k1, k into front and back of last st - 5 sts Row 3: K Row 4: k1, k into front and back of next st, k1, k into front and back of next st, k1 - 7 sts Row 5: K Row 6: k1, k into front and back of next st, k across to last 2 sts, k into front and back of next st, k1 - 9 sts Row 7: K Rep last 2 rows until there are 41 (47, 53, 59) sts. Piece should be a triangle and measure 9½ (10½, 11½, 12½)" across and lengthwise. K 1 row even. Turn one corner: Row 1: k1, k into front and back of next st, k across to last 3 sts, k2tog, k1 Row 2: k Rep Rows 1 and 2 until long edge measures approximately 14". Turn both corners: Row 1: k1, k2tog, k across to last 3 sts, k2tog, k1 Row 2: k Rep Rows 1 and 2 until 3 sts rem. K3. K3 tog. Complete Body Decide which way you want garter ridges to run and sew long edges of rectangles together. Bottom Band Along wide bottom edge, with RS facing pick up 62 (68, 76, 84) sts. Work in garter st 1". BO. Yoke Along other wide edge, with RS facing pick up 62 (68, 76, 84) sts. Work 3 rows in St st. BO 4 sts beg next 2 rows. Dec 1 st at each end every other row 4 (6, 8, 9) times as follows: K1, SSK, k across to last 3 sts, k2tog, k2 - 46 (48, 52, 58) sts Cont to work even in St st until armhole measures 8½ (8½, 9, 9½)". BO 4 (4, 5, 6) sts beg next 2 rows, then BO 5 (5, 6, 7) sts beg next 2 rows. Place rem 28 (30, 30, 32) sts on holder for back of neck. Front Work same as back until armhole measures 3½ (3½, 4, 4½)"; armhole decreases should be completed. Placket/Neck Shaping K20 (21, 23, 25) sts. Put rem sts on holder. Cont to work 20 (21, 23, 25) sts in St st until armhole measures 5 ½ (5 ½, 6, 6 ½)". At neck edge, BO 4 (4, 5, 5) sts. Dec 1 st at neck edge every other row 7 (8, 7, 7) times as follows: K across to last 3 sts, k2 tog, k1 Cont to work even until armhole measures same as Back. BO shoulders as for back. Place sts from holder on needle. BO center 6 (6, 6, 8) sts. Work as for other side of neck, reversing shaping. Sleeves CO 34 (36, 42, 44) sts. Working in garter st, k 1 row. Dec 1 st at each end every other row 4 times. K 1 row - 26 (28, 34, 36) sts Next row (RS): Working in St st, inc 1 st each end every 4th row 7 (5, 4, 8) times, then every 6th row 8 (9, 9, 7) times - 56 (56, 60, 66) sts. Work even until sleeve measures 18 (18, 18½, 18½)" from beg. BO 4 sts beg next 2 rows. Dec 1 st at each end every other row 17 (17, 19, 21) times as follows: K1, SSK, k across to last 3 sts, k2tog, k1 BO 14 (14, 14, 16) sts. 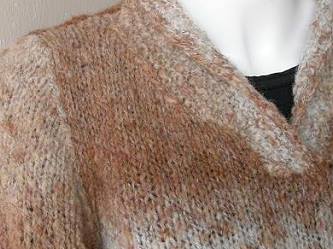 Shawl Collar
Seam shoulders. With circular needles and right side facing, pick up 7 (7, 7, 7) sts along right placket edge, place neck edge marker, pick up 5 (5, 6, 7) sts along right neck edge, place shawl collar marker, pick up 16 (16, 17, 18) sts along rem right neck edge, k 28 (30, 30, 32) sts from Back neck sts on holder, pick up 16 (16, 17, 18) sts along left neck edge, place shawl collar marker, pick up 5 (5, 6, 7) sts along rem left neck edge, place neck edge marker, pick up 7 (7, 7, 7) sts along left placket edge. Do not join. Turn. Work Short Rows For Collar To wrap and turn: Slip next st from left to right needle with yarn in front. Bring yarn to back. Place marker on left needle. Return the slipped st to the left needle. Turn work around. Working back and forth in garter stitch, k to second shawl marker, remove marker, wrap and turn. Knit back to opposite shawl marker, remove marker, wrap and turn. Cont until all sts between the neck edge markers have been worked. Cont working in garter st over all sts on needle until placket edge bands measure 1½ (1½, 1½, 2)". BO. Seam the right bottom edge of collar to the BO neck edge of sweater. Seam the left bottom edge of collar to the same BO neck edge of sweater on the inside (WS) of the neck edge. Finishing Sew in sleeves. Seam sleeves and sides. Weave in ends on WS. ©Barbara Breiter. This design may not be reproduced in any manner without the expressed written consent of the author. See Abbreviations and the Glossary for help. Also see Knit A Bit, for patterns by Barbara Breiter |