
Hundreds Of Free Knitting Patterns And So Much More |
Barbara Breiter's Knitting On The Net |
|
Learn To Knit
|
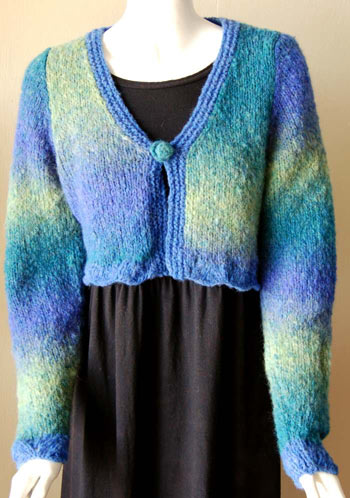
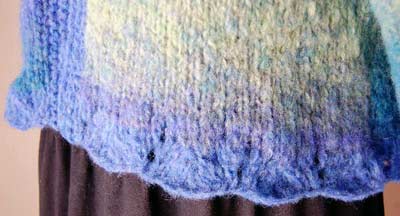
Cropped Cardigan Knitting PatternDesigned by Barbara Breiter Finished Chest Measurement - 36 (40, 44, 48)" S (M, L, XL) Gauge: 14 sts and 19.5 rows=4" in St st Materials: Size 10 US (6 mm) straight needles or size needed to obtain gauge Size 10 US (6 mm) 36" circular needles Size H-8 (5 mm) crochet hook Tapestry needle Merino Stripes by Crystal Palace Yarns Merino Stripes is a brushed wool blend yarn that is self-striping. Three colors are combined in each ball. 4 (4, 5, 5) balls (Color A) - Color 061 Seascapes 90% Merino wool/10% polyester 50 grams/1.75 ounces 115 yds/105 meters Merino Frappe by Crystal Palace Yarns 1 (1, 1, 2) balls (Color B) - 102 Cornflower 140 yards/50 grams 80% Australian Merino/20% nylon Instructions: Lace Edging Pattern Stitch Rows 1 and 3 (WS): Purl Row 2: k3, *yo, k2, ssk, k2tog, k2, yo, k1; rep from *, end k1 Row 4: k2, *yo, k2, ssk, k2tog, k2, yo, k1; rep from *, end k2 Back With Color B, CO 67 (76, 85, 94) sts. Work in Lace Pattern Stitch 4 rows. Change to Color A and St st. WS: Dec 3 (6, 7, 8) sts evenly across first row - 64 (70, 78, 86) sts Work in St st until piece measures 6" from the start of Color A. BO 5 sts beg next 2 rows. Dec 1 st at each end every other row 4 (6, 8, 9) times as follows: K1, SSK, k across to last 3 sts, k2tog, k2 - 46 (48, 52, 58) sts Cont to work even in St st until armhole measures 8½ (8½, 9, 9½)". BO 4 (4, 5, 6) sts beg next 2 rows, then BO 5 (5, 6, 7) sts beg next 2 rows. Place rem 28 (30, 30, 32) sts on holder for back of neck. Right Front With Color B, CO 40 (40, 49, 49) sts. Work in Lace Pattern Stitch 4 rows. Change to Color A and St st. WS: Dec 11 (8, 13, 9) sts evenly across first row - 29 (32, 36, 40) sts Work in St st until piece measures 6" from the start of Color A. Next row (WS): At armhole edge, BO 5 sts. P across row. Dec 1 st at armhole every other row 4 (6, 8, 9) times. At same time, dec 1 st at neck edge every other row 4 (5, 5, 5) times, then every 4th row 7 (7, 7, 8) times. Cont to work even in St st until armhole measures 8½ (8½, 9, 9½)". BO shoulders as for Back. Left Front As for Right Front, reversing shaping. Sleeves With Color B, CO 31 (31, 40, 40) sts. Work in Lace Pattern Stitch 8 rows. Change to Color A and St st. WS: Dec 5 (3, 6, 4) sts evenly across first row - 26 (28, 34, 36) sts Next row (RS): Working in St st, inc 1 st each end every 4th row 7 (5, 4, 8) times, then every 6th row 8 (9, 9, 7) times - 56 (56, 60, 66) sts. Work even until sleeve measures 18 (18, 18½, 18½)" from beg. BO 5 sts beg next 2 rows. Dec 1 st at each end every other row 17 (17, 19, 21) times as follows: K1, SSK, k across to last 3 sts, k2tog, k1 BO 12 (12, 12, 14) sts.  Edging
Seam shoulders. With circular needles, Color B, and RS facing, beginning at lower Right edge, pick up 65 (65, 67, 69) sts along Right Front edge, k 28 (30, 30, 32) sts from Back neck holder, pick up 65 (65, 67, 69) sts along Left Front edge. Working back and forth, k 4 rows. BO. Finishing Sew in sleeves. Seam sleeves and side seams. Weave in ends on WS. Button Loop With Color A and RS facing, working on left edge, insert hook through BO edge at point where neck shaping began. Yarn over hook and pull up a loop. Ch 5. Remove loop from hook. Insert hook through BO edge 3 sts down (toward CO edge). Place loop back on hook. Yarn over hook and pull through loop and knit edge. Ch 1, turn. Work sc around chain tightly: With working yarn on far side of chain, insert hook under ch, yarn over hook, bring hook to near side of chain (2 loops on hook), yarn over hook and pull through 2 loops on hook. End with slip st into beginning insertion point.  Crocheted Button
With Color A, leaving a 12" tail, make a slip knot, ch 3. Join with slip st to 1st ch to form ring. Work 4 sc in ring. Work 2 sc in each sc - 8 sc Sc2tog across- 4 sc Fasten off, leaving a second 12" tail. With tapestry needle, thread first tail through center and stuff in button. Thread second tail. Baste and pull in each sc to tighten and close button. Use remaining tail to sew on right edging, aligning with button loop. Alternatives Use no button at all. You can also use a pin instead, a loop and a commercial button, or I-Cord that is either attached or sewn on. ©Barbara Breiter. This design may not be reproduced in any manner without the expressed written consent of the author. See Abbreviations and the Glossary for help. Also see Knit A Bit, for patterns by Barbara Breiter |