
Hundreds Of Free Knitting Patterns And So Much More |
Barbara Breiter's Knitting On The Net |
|
Learn To Knit
|
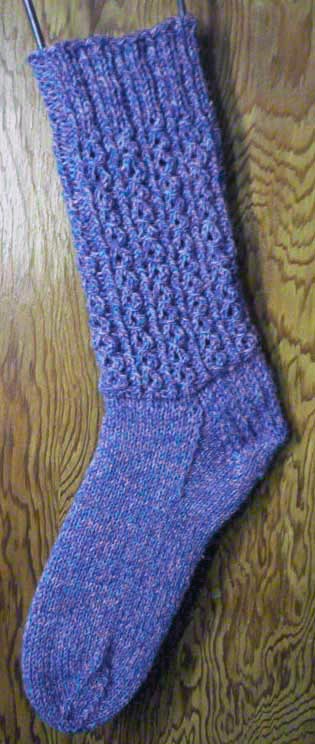
Mock Cable Socks Knitting PatternDesigned by Cynthia Guggemos The socks appear cabled but it's just an increase and decrease combination. The stitch pattern pulls in so these socks stay up.
Gauge:
The socks appear cabled but it's just an increase and decrease combination. The stitch pattern pulls in so these socks stay up.
Gauge:24 sts=4 inches in St st Materials: 100 grams (about 300 yards) of sock weight yarn Size 3 US (3.25 mm) double points (set of 5) Tapestry needle Size: Fits most women Instructions Rib Pattern: Every rnd: *K1tbl, p1, k2, p1; rep from * Leg Pattern: Note that the stitch count varies as the yarn over increase is worked on Rnd 2 and the decrease is not worked until Rnd 4. Rnd 1: *K1tbl, p1, k2, p1; rep from * Rnd 2: *Kltbl, p1, k1, yo, k1, pl; rep from * Rnd 3: *K1tbl, p1, k3, p1; rep from * Rnd 4: *K1tbl, p1, k3, with the tip of the left needle, lift the third stitch on the right needle over the first two sts and drop it off, pl; rep from* Ribbing CO 50 sts, dividing over 4 needles (15, 10, 15, 10). Join being careful not to twist. Mark join as the beginning of the rnd and center of heel. Work 1 to 2 inches in rib pattern. Leg Work Rnds 1-4 of Leg Pattern until leg measures 7½ inches, or desired length. Finish by working rnd 1. Rearrange the sts so there are 13 on needle 1, 12 on needle 2, 13 on needle 3 and 12 on needle 4. Work 1 rnd of knitting. Next rnd: (K2tog, k23) two times. There should now be 12 sts on each of the four needles. On the next rnd, knit the sts on needles one, two and three. Drop the working yarn. Slide the sts from needle one onto needle four. Pick up the working yarn and begin working heel flap on these 24 sts. Heel Flap Note: Heel flap is worked in back and forth in rows on 24 sts. The instep sts can be left on needles 2 and 3, or slipped onto a piece of scrap yarn or a holder until the heel turn is completed. Heel Pattern Row 1: *Slip 1, k1 repeat across from * Row 2: Slip 1, purl across Work in heel pattern until the heel flap is 2¼ inches long. End with Row 2 completed. Turn Heel Row 1: Sl 1, K13, K2tog, K1 turn Row 2: Sl 1, P5, P2tog, P1, turn Row 3: Sl 1, K6, K2tog, K1, turn Row 4: Sl 1, P7, P2tog, P1, turn Repeat Rows 3 and 4, increasing 1 additional K or P stitch after the Sl 1 until all side sts are used. End with a purl row. Gusset Knit to the center of the heel. Using a spare needle, knit across the remaining heel sts, then pick up and knit one st in every slipped st along the side of the heel flap and one extra stitch in the gusset corner (needle 1). Knit across needles 2 and 3. With needle 4 pick up and knit one st in the gusset corner and then pick up and knit one st in every slipped edge st along the side of the heel flap, knit the remaining heel sts. Gusset Decrease and Sock Foot Rnd 1: Needle 1: Knit until the last 3 sts, k2tog, k1 Needles 2 and 3: Knit around Needle 4: K1, SSK, knit around Rnd 2: Knit around Repeat these 2 rnds until total sts equal 48. Transfer sts as necessary so that you have returned to your original st placement (12, 12, 12, 12). Sock Foot Continue knitting in stockinette until the foot measures approximately 1½ to 2 inches less than desired finished length (see note on sizing below). Shape Toe Rnd 1: Needle 1: Knit until the last 3 sts, K2tog, K1 Needle 2: K1, SSK, knit around Needle 3: Knit until the last 3 sts, K2tog, K1 Needle 4: K1, SSK, knit around Rnd 2: Knit around Continue in this manner until you have approximately 18 sts rem or until sock has your desired toe shape. Graft toe closed. Note On Sizing The best way to size your own socks is to try them on as you go, but if you are knitting for someone else here are suggested lengths from the back of the heel to the end of the toe shaping. Women's shoe size: 5-6 (finished length 8½") 7-8 (finished length 9¼") 9-10 (finished length 10¼") See Abbreviations and the Glossary for help. |