
Hundreds Of Free Knitting Patterns And So Much More |
Barbara Breiter's Knitting On The Net |
|
Learn To Knit
|
Links Of Lace SocksDesigned by Nancy McFarlane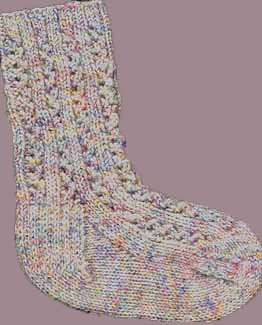 Knit by Valerie Stewart. Materials: 2 2.5oz balls of Woolease or other light worsted yarn (I used Pines which is a smaller skein than the solids.) 1 set of size 4 US double point needles (set of 5) Gauge: 5.5 =1" in stockinette Lace Pattern: Rnd 1: *K2, P1, yo, K2togtbl (knit two together through back loop), P1 repeat from *across Rnd 2: *K2, P1 repeat from *across Rnd 3: *K2, P1, K2tog, yo, P1 repeat from *across Rnd 4: Repeat rnd 2 Instructions: Cast on 49 stitches. The pattern uses 48 and the extra stitch is knit together with the first stitch cast on to make a tighter join. Divide the stitches so there are 12 sts on each of 4 needles. Work in K2, P1 ribbing for 7 rounds or desired length. Begin lace pattern Working 4 pattern rows until work measures 7-8 inches from cast on. Mark down which row of pattern you worked last so you will know which one to begin with when you resume working on the instep. Heel Flap Now knit across stitches on the next two needles (24 sts). These will be the stitches for your heel. Put remaining stitches (instep stitches) on a holder or a thread to be worked later. Heel Row 1: Sl1, then purl across row Row 2: Sl1,k1 across the row Repeat these two rows until there are 12 large loops on side of heel flap ending with a wrong side row (Row 1). You are now ready to turn the heel. With the right side facing K14, k2tog, k1, turn Row 1: 1, p5, p2tog, pl, turn Row 2: slip 1, k6, k2tog, k1, turn Continue in this manner each time increasing by one the number worked after slipping the first stitch. You are working to the "gap" each time and then will work 2 sts tog, work 1 st and turn. When all the stitches have been worked finish so that you are ready to begin a right side row (14sts). Knit across first 7 stitches. This will be your new needle #4 and will be the new center of your heel and sock (mark with a pin as your cast on tail is no longer the center). With another needle (#1) knit across the other 7 heel stitches and then pick up and knit 12-13 sts along the heel flap. Pick up enough to close the gap between the flap and the instep. Now with needle #2 work in pattern (check your notes to see last pattern row worked) across 24 instep stitches. Finally, pick up and knit 12-13 sts along last side of heel flap (number does not have to be same as first side - you will even them up later) and knit across 7 sts of heel. You are now at the beginning of a new round and are ready to begin decreasing for the gussets. Stitches can be left on 3 needles or 4. If using 3 you should have 7heel sts and 12-13 flap stitches on needle #1, 24 instep sts on needle#2, and 12-13 sts plus 7 heel sts on needle 3. If you use 4 needles the instep stitches will be divided so there are 12 on each needle. The decreases will be worked at the end of the first needle and the beginning of the last needle (either #3 or #4). Rnd 1: Knit to last 3 stitches, k2tog, k1. Knit in pattern across instep stitches. K1, ssk, knit to end of last needle. Rnd 2: Knit across first needle, pattern across instep needle(s), knit across last needle. Continue with these 2 rounds until there are 12 sts on first and last needle. (If you picked up an uneven number of stitches along heel flap you may have to do one or two extra decreases on one needle only.) Now continue in pattern - knitting on first and last needles and doing lace pattern on instep - until sock (slightly stretched) measures 2" less than length of foot. It is important to measure it slightly stretched to ensure a snug fit. Toe You will now discontinue pattern across instep stitches and will be knitting plain. Rnd 1: Knit across all needles Rnd 2: On first needle, knit to last 3 sts, k2tog,k1. K1,ssk, knit to last 3 instep sts, k2tog, k1. On last needle, k1, ssk, knit to end. Continue these 2 rounds until 16sts remain. Knit across 4sts on needle #1 so you have 8 sts on needle (back needle). If you were using 4 needles put remaining 8 sts on another needle (front needle). You are now ready to graft your toe. Cut the yarn coming from the back needle to about 18" and thread it on a tapestry needle. With the back needle to the back and the front of the sock needle facing you (wrong sides of toes are together) put the needle as to purl (the needle will be going down through the stitch) in the first stitch of the front needle. Then put the needle as to knit (the needle will be going up through the stitch) in the first stitch on the back needle. This is your foundation. 1.Put the needle up (as to knit) in the first stitch on the front needle (the one you already went into) and remove the stitch from the needle. Then put the needle down (as to purl) into the next stitch on the front needle (your first time in this stitch) and leave the stitch on the needle. 2. Put the needle down (as to purl) in the first stitch on back needle (you went into this one once in foundation step) and remove the stitch from the needle. Then put the needle up (as to knit) into the next stitch on the back needle (your first time in this stitch) and leave this stitch on. Continue alternating between 1 and 2 until all stitches have been worked off the needles. Pull slightly to snug up stitches and weave in end. Remember that when grafting you will go through each stitch on the needle twice with the tapestry needle before removing it - once as a knit and once as a purl - this forms both legs of a knit stitch. This pattern was written for all to enjoy. You may copy it for friends, put it on Web pages, etc as long as it is not sold, either individually or as part of a kit, and as long as this paragraph is included. Enjoy! See Abbreviations and the Glossary for help. |