
Hundreds Of Free Knitting Patterns And So Much More |
Barbara Breiter's Knitting On The Net |
|
Learn To Knit
|
Ear Flap HatDesigned by Leef Bloomenstiel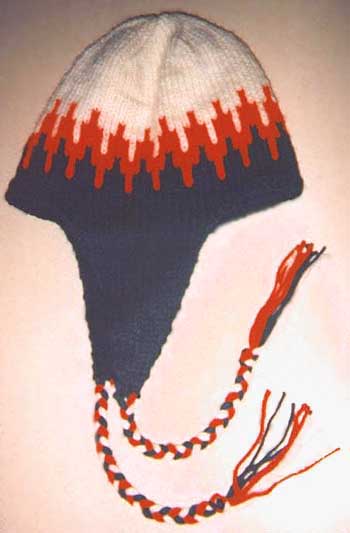 Worsted weight yarn in three colors. I used green, red, and cream. 16 inch circular size 6, set of size 6 dpns 1 straight size 8 needle tapestry needle Size: Finished size is for a woman's medium size hat. Gauge: About 18 sts per 4 inches. Hint: Make one ear flap for a test swatch. Read the second to last paragraph of this pattern now! You can also determine your row gauge here in case you want to use a different color pattern graph. Instructions: I. Make two ear flaps, using green yarn, size 6 dpns. Using two size 6 dpns, cast on 4 stitches. Knit one row, then purl one row. Row 1: K1, M1, knit to last stitch, M1, K1 Row 2: Purl Row 3: Knit Row 4: Purl Repeat rows 1-4, until Row 1 ends with 20 stitches on the needle. Purl one row. Keep it on the needles and using the other pair of dpns, make an identical ear flap. Now you have two ear flaps on the needles. II. Begin hat, using green yarn, size 8 straight. Take the size 8 straight needle and using a cable cast on (see the last paragraph), cast on 10 stitches. Take one of the ear flaps (make sure that the stockinette, the right side, faces you) and knit the stitches from the size 6 dpn, onto the size 8 straight needle adding them to the cast on stitches. At the end of the ear flap, and using a cable cast on, cast on 24 stitches. Again, take the other ear flap (make sure that the stockinette, right side, faces you), and knit the stitches from the size 6 dpn onto the size 8 needle. At the end of this ear flap, and using a cable cast on, cast on the final 10 stitches. You should have 84 stitches total: 10 stitches, 20 stitch ear flap, 24 stitches for the front of the cap, another 20 stitch ear flap, and a final 10 stitches. Transfer these stitches to the size 6, 16 inch circular needle, making sure that the stockinette sides (right sides) of the ear flaps face the outside. Join and mark the center or beginning of the round. (There should be 10 stitches before the marker on either side, before the ear flaps.) A Word About Sizing: If you want to make a larger or smaller hat, take the total number or stitches you need to increase or decrease, and divide it by 2. Increase or decrease by that number in both the front 24 stitch section between the earflaps and the back 20 stitch section between the earflaps. Do this in the beginning when you cast on. It is good to remember to keep the total number divisible by 4, as that will make the color pattern below fit properly. If you are using a different color pattern, use that repeat. 1. Knit one round. 2. Purl 10, Knit 20, Purl 24, Knit 20, Purl 10 3. Knit 3 more rounds, then begin 14 row chart below (begin at the bottom). It is a 4 stitch pattern repeat. Note: The neat thing about this hat is that you can use just about any color pattern! You can also choose not to use a pattern at all, and do stripes instead. A lot of the hats in the stores (Gap, Express, Old Navy...) used one color for the bottom, a short two or three row color contrast just about two inches above the brim, and another solid color for the top. Just remember than you have only six inches to work with, before you need to make the crown decreases. So calculate your row gauge and plan your color accordingly. X - red 0 - cream = - green X 0 0 0 X 0 0 0 X 0 0 0 X X 0 X X X 0 X X X 0 X X X 0 X = X X X = X X X = X X X = = X = = = X = = = X = = = X = Break off the red and continue knitting with the cream in stockinette st, until the hat measures six inches. (Measure from the 24 stitches, the front of the hat, between the earflaps to the needles.) III. Begin the hat decreases Note: If you have increased or decreased these stitches in order to change the hat size, take your total stitch count and divide by six. If there is any remainder, knit one round decreasing evenly around by that number so that the spiral decrease can work evenly. In this hat I have used 84 stitches. 84 divided by 6 is 14, so follow the following decrease formula. * Knit 12 stitches, SKPO (SKPO = slip one, knit one, and pass the slipped stitch over the just knitted stitch), PM (PM - place marker) ** Repeat * to ** all the way around. Decrease on each round by knitting to two stitches before each marker, SKPO. You should be decreasing 6 stitches per round. At some point you will have to replace the circular needle with dpns. Stop when there are 6 stitches left. Break yarn and using a tapestry needle, run the length through the remaining stitches, closing it off. Weave in all ends, then make the braids and tassels for the ear flaps. At the point of each ear flap, where you casted on 4 stitches at the base or point of the ear flaps, there are three spaces at the bottom between the stitches. I used a two yard strand of each color, folded it in half and put two strands through a tapestry needle and pulled each color through this space. Even up the ends, cut the loops and braid the length, ending it with an overhand knot. Un-braid the yarn below the knot and trim for a tassel. Some Solutions To The Ear Flaps: The stockinette stitch will tend to curl on the ends. I had good luck with mine by doing some light blocking. Some yarns may require a crocheted or crab stitch edge to stop the curling. You will have to see what works the best for your particular yarn. The hats like these in the stores are lined with a cotton flannel type material. I thought about making 4 ear flaps and using the other two for linings. Many solutions here, but the best ones will depend on the particular yarn you choose, so you might want to let your test swatch be an ear flap so that you can play with it and see what works best. Also, I modeled the hats after the ones in Gap, Express, Old Navy, that had the long ear flaps. If you do not like them long, you can make them shorter by making the increases every knit row instead of every fourth row of the 4 row repeat. Cable Cast On: Using one strand of yarn, make a slip knot on the needle. Knit into this stitch, pull the loop through and place it on the needles. Two stitches cast on. For all the other stitches, put the tip of the needle between the last two stitches and pull a loop through and place it on the needles. For this pattern, I used the size 8 straight needle to cast onto, and one of the size 6 dpns to pull the loops with. ©1999 Leef Bloomenstiel leef1@texoma.net See Abbreviations and the Glossary for help. |