
Hundreds Of Free Knitting Patterns And So Much More |
Barbara Breiter's Knitting On The Net |
|
Learn To Knit
|
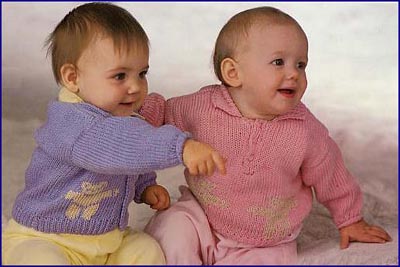
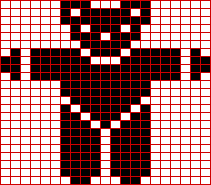
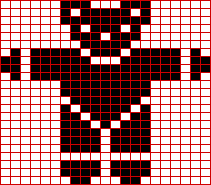
Teddy Bear Cardigan Or Pullover Baby Knitting PatternCrystal Palace Yarns Up to 6 months (6-12 months, 12-24 months) Finished Chest 18 (20, 22) [46, 51, 56 cm] Materials: Breeze by Crystal Palace Yarns 3 (4, 4) Color A 1 (1, 1) Color B 100% mercerized cotton 50 grams/110 yards Size 2 US (3 mm) and size 5 US (3.75 mm) needles For pullover, above needles and size 3 US (3.25 mm) Buttons: 4 for cardigan, 3 for pullover Gauge: 22 sts and 28 rows = 4" [10 cm] in St st with size 5 (3.75 mm) needles. Note: When working from charts, use a separate length of yarn for each area of color, and twist yarns on wrong side when changing color to avoid making a hole. Instructions for the larger sizes are given in () brackets; when one figure only is given this applies to all sizes.   Back With size 2 (3 mm) needles and A, CO 52 (58, 64) sts. Work 6 (8, 10) rows k1, p1 rib. Change to size 5 (3.75 mm) needles and work 62 (70, 78) rows St st. BO loosely. Left Front With size 2 (3mm) needles and A, CO 24 (28, 32) sts. Work 6 (8, 10) rows k1, p1 rib. Change to size 5 (3.75 mm) needles and work 2 rows St st **. Cont in st st and work from chart 1 thus: 1st row: K1 (5, 7) A, patt 21 sts of 1st row of chart, k2 (2, 4) A. Cont as est until chart is complete, then cont with A only and work 11 (13, 15) rows, ending with a p row. Shape Front Dec 1 st at end of next row and at same (front) edge on every foll 3rd row until 17 (19, 21) sts rem. Work 7 rows even. BO loosely. Right Front Work as for left front to **. Cont in St st and work from chart 1 thus: 1st row: K2 (2, 4) A, patt 21 sts of 1st row of chart, k1 (5, 7) A. Cont as est until chart is complete, then cont with A only and work 11 (13, 15) rows, ending with a p row. Shape Front Dec 1 st at beg of next row and at same (front) edge on every foll 3rd row until 17 (19, 21) sts rem. Work 7 rows even. BO loosely. Sleeves With size 2 (3mm) needles and A, CO 28 (30, 32) sts. Work 5 (7, 9) rows k1, p1 rib. Inc row (WS): Rib 1 (2, 3), * m1, rib 5; rep from * to last 2 (3, 4) sts, m1, rib 2 (3, 4). [34, 36, 38 sts] Change to size 5 (3.75 mm) needles, cont in St st and inc 1 st at each end of 7th and every foll 5th row until there are 44 (48, 52) sts. Work 7 (12, 17) rows even. BO loosely. Front Band Taking 1 st into seams and matching sts, join both shoulder seams leaving 18 (20, 22) sts for back neck. With size 2 (3 mm) needles and A, CO 7 sts. 1st row (RS): K2, (p1, k1) twice, k1. 2nd row: K1, (p1, k1) to end. These 2 rows form the rib. Rep them once. Next row (make buttonhole): K2, p2 tog, yo, p1, k2. Rib 9 (11, 13) rows, then rep buttonhole row. Rep last 10 (12, 14) rows twice more, thus 4 buttonholes will have been worked. Cont in rib until band, when slightly stretched, fits up both fronts and across back neck. BO in ribbing. Finishing Taking 1 st into seams, beg and ending 4 (4.25, 4.75)" [10, 11, 12 cm] from shoulders, sew sleeves to sides. Join side and sleeve seams. Sew on front band as shown. Sew on buttons. Instructions For Pullover Back Work as for back of cardigan. Front Work as for back of cardigan to **. Change to size 5 (3.75 mm) needles and work 2 rows st st. Cont in St st and work from chart 2 thus: 1st row: K3 (5, 7) A, patt 21 sts of 1st row of chart, k4 (6, 8) A, patt 21 sts of 1 st row of chart, k3 (5, 7) A. Cont as est until chart is complete, then cont with A only and work 7 (9, 11) rows, ending with a p row. Front Opening Next row: K24 (27, 30) sts, turn. Cont on these sts only. Work 20 (24, 28) rows even, ending at inner edge. Shape Neck Dec 1 st at beg of next row and at same (neck) edge on foll 6 (7, 8) rows (17, 19, 21 sts) Work 4 (5, 6) rows even. BO loosely. With RS facing, rejoin A and BO center 4 sts, k to end.(24, 27, 30 sts) Work 20 (24, 28) rows even, ending at outer edge. Dec 1 st at end of next row, then complete as given for 1st side. Sleeves Work as for sleeves of cardigan. Collar With size 3 (3.25 mm) needles and A, CO 61 (65, 69) sts. 1st row (RS): K2, (p1, k1) to last st, k1. 2nd row: K1, (p1, k1) to end. These 2 rows form the rib. Rib 18 (22, 26) rows more. BO loosely in ribbing. Front Bands Buttonhole Band With size 2 (3 mm) needles and A, CO 7 sts. Rib 6 rows as for collar. Next row (make buttonhole): K2, p2 tog, yo, p1, k2. Rib 7 (9, 11) rows, then rep buttonhole row. Rep last 8 (10, 12) rows once, thus 3 buttonholes will have been worked. Rib 3 rows. BO in ribbing. Button Band With size 2 (3mm) needles and A, CO 7 sts. Rib 26 (30, 34) rows as for collar. BO in ribbing. Finishing Taking 1 st into seams and matching sts, join both shoulder seams, leaving 18 (20, 22) sts for back neck. Beg and ending 4 (4.25, 4.75)" [10, 11, 12] from shoulders, sew sleeves to sides. With bound off edges at top, sew front bands to sides of front opening as shown. Lap buttonhole band over button band and sew ends to bound off sts at center front. Join side and sleeve seams. Beg and ending at inner end of front bands and using a flat seam, sew CO edge of collar to neck, ensuring that right side of collar is facing when folded over. Sew on buttons. ©Crystal Palace Yarns and used with their permission. See Abbreviations and the Glossary for help. |