
Hundreds Of Free Knitting Patterns And So Much More |
Barbara Breiter's Knitting On The Net |
|
Learn To Knit
|
Baby Bib Knitting PatternDesigned by Catherine M. Ford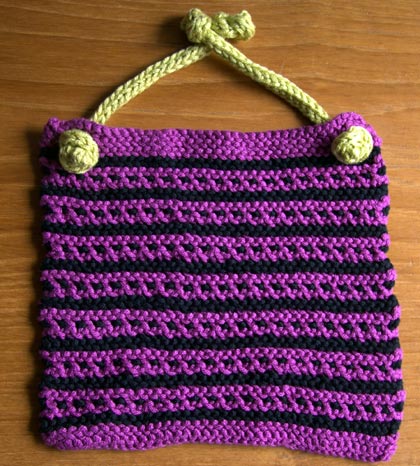 Bib: Approximately 8" wide and 7" in length Straps: 9" prior to knots being tied. Length will vary depending on how tight knots are tied. Materials: Tahki Cotton Classic 100%cotton 108 yards/50 grams 3 colors of your choice for MC, CC1 and CC2 About ½ skein of MC and CC1 was used and 12-15 yards of CC2 for straps. If desired, use MC or CC1 instead for straps. Size 6 US (4 mm) needles Size 6 US (4 mm) double points for I-cord Tapestry needles Gauge: 20 sts and 38 rows=4" in garter stitch Instructions Pattern Stitch (odd number of sts) Rows 1 and 2: With MC, k Row 3: With CC1, *k1, sl 1 wyib as if to purl; rep from * to last st, k1. Row 4: With CC1, *k1, sl 1 wyif as if to purl; rep from * to last st, k1. Rows 5 and 6: With MC, k Rows 7 and 8: With CC1, k Bib With MC, CO 41 sts. Rows 1-3: k Rows 4 and 5: With CC1, k Do not cut yarns. I use Nancie Wiseman's (The Knitters Book of Finishing Techniques) method for attaching the new yarn color which is called the Magic Knot. You tie the new yarn around the old yarn with just a single knot which allows you to slip the new yarn up the strand of the old yarn. It also allows you to untie it easily should you need to. Begin Pattern Stitch and work 7 times. Change to MC (you are now on Row 62, garter rib 31 if you are counting)and k 1 row. Buttonhole Rows: (This is a 2 stitch buttonhole. It is made by binding off 2 stitches on the first row, then casting on 2 stitches over the bound off stitches in the next row. A third row using a special technique finishes off the buttonhole.) Row 63: K6 (when you BO, you need to knit to the 6th st so that there will be 4 sts left on the edge of the bib when you do the bind off), BO 2 sts (be sure to pull the last BO stitch right), k to the last 5 sts, BO 2 sts, K to the end. (Note: There should be 4 stitches on the bib edge side of each buttonhole.) Row 64: K4, turn and CO 2 sts using the Cable cast on, turn and K to the BO stitches at the other end of the work (4 stitches from the end), turn and CO 2 sts using the cable method, turn and knit to the end. Row 65: K, pick up the loose thread at the start of each buttonhole, work the next stitch and then pass the picked up stitch over the worked stitch so that you don't increase the number of stitches. Pull the working yarn firmly after passing over to prevent any loops forming. Row 66: K BO. Weave in ends on WS. Straps Make two 9" if using double straps or one 12" if using a single strap. CO 4 sts. Work I-Cord. Finishing For double straps: Slip the finished end of the i-cord through one buttonhole from the wrong side of the work to the right side. Tie a loose overhand knot at the end of each i-cord strap. Pull the strap so that the knot on the right side of the bib is snug against the bib. Do the same thing on the other side of the bib. For the single strap: Slip the finished end of the i-cord through one buttonhole from the wrong side of the work to the right side. Tie a loose overhand knot at each end of the i-cord strap. Pull the strap so that the knot on the right side of the bib is snug against the bib. The knot at the other end of the 12" strap will serve as a "button fastener". A half of a square knot, just one strap looped over the other, will keep the bib in place. The knots at the ends of the straps hold the straps in position. When you are finished using this as a bib, untie the straps and you have a lovely cloth for kitchen or bath. © Catherine M. Ford. Visit Catherine's blog CatKnitz See Abbreviations and the Glossary for help. |